Moist Banana Bread

There is truly nothing better than fresh-baked bread right out of the oven (well, actually fresh-baked cookies could give it a run for its money). 

This holiday, I was on a banana bread fix and made 6 loaves over a 3-day span.   I made it Christmas eve morning for the boys and my in-laws, made it for my extended family gathering on Christmas day, and then made another batch for my college holiday gathering on the 26th.  And amazingly enough, I'm still not banana-ed out!

Here's the recipe I use for a moist great-plain-for-breakfast or even-better-when-paired-with-vanilla-ice-cream banana bread.

MOIST BANANA BREAD
{ Prep time: 15 minutes; Bake time: 1 hour }

Ingredients
  • 4 ripe bananas
  • 1/3 cup melted butter
  • 1 cup sugar (you can reduce to 3/4 cup)
  • 1 egg, beaten
  • 2 tablespoons applesauce (this is key to making the bread moist)
  • 1 teaspoon pure vanilla extract
  • 1 teaspoon baking soda
  • Pinch of salt
  • 1 1/2 cups of all-purpose flour

Directions

Preheat the oven to 350°F.  Place bananas in a large mixing bowl and mash with a potato masher.  Mix the melted butter into the mashed bananas.  Then mix in the sugar, egg, applesauce, and vanilla.  Mix in the baking soda and salt.  Add the flour last and mix.  Pour the mixture into a buttered 4x8 inch bread loaf pan.  Bake for 1 hour (if your oven tends to heat faster, you should check it at 45 minutes and see if it's cooked - overcooking will dry out the bread).  Keeping the bread in the pan, cool it on a rack.  Remove from pan and slice to serve.
The slice of bread goes perfectly with a scoop of vanilla ice cream.  You could easily add chopped walnuts or raisins.  But if you're making it for an event or gathering, I'd suggest keeping it simple because (1) you never know if someone has nut allergies and (2) you just can't go wrong with plain banana bread.

Peppermint and More Peppermint

{ peppermint pretzels with peppermint cocoa.  yum.  }
Chocolate-covered peppermint pretzel rods drizzled with white chocolate paired with peppermint chocolate cocoa (available from Crate & Barrel).  Could there be a better match?  I think I've died and gone to peppermint heaven.

The pretzel rods were super easy to make!  I followed the same steps as I did for making the chocolate-covered pretzels but made two variations.  First, I added 2 teaspoons of peppermint extract to the melted chocolate to give it a more minty taste.  And then I drizzled white chocolate over the dark (I used a chopstick to do this) to make it more decorative before sprinkling on the peppermint.

Delicious.

Chocolate-Covered Peppermint Pretzel Rods
{ Makes about 24 pretzel rods }

Ingredients
  • 1 package (12 oz) semi-sweet chocolate chips
  • 1 package (12 oz) white chocolate chips
  • 1 tbsp shortening (this helps temper the chocolate for dipping)
  • 2 tablespoons peppermint extract
  • Large bag of pretzel twists
  • Peppermint candy canes 

Directions
  1. Place unwrapped candy canes in a ziploc bag and crush into small pieces with a hammer.
  2. Prepare a baking sheet by lining it with parchment paper.
  3. Combine the chocolate chips, the shortening, and peppermint extract in a small pot and stir over low heat.  Once the chocolate is smooth and melted, remove from heat.
  4. Using tongs, fork, or chopsticks, dip the pretzel rod in the chocolate.  Tap the chocolate-dipped pretzel several times to remove excess chocolate, and place it on the prepared baking sheet. 
  5. Melt the white chocolate chips over low heat.  Then take a fork (I used a chopstick) to drizzle it over the dark chocolate.  Sprinkle with peppermint candy.
  6. Place the pretzels in the refrigerator for about 30 minutes to set the chocolate.

Chocolate-Covered Peppermint Pretzels

{ the perfect combination of salty and sweet in really festive shapes }
Some snacks are just dangerously addictive.  Chocolate-covered pretzels are one of them.  It's the perfect combination of both salty and sweet.  I made a batch last week, and while my husband and I were idly surfing the web, we devoured the entire bag within minutes. 

Since you possibly can't go wrong with these, I decided to make them as holiday treats for my office, my husband's, and for my sister-in-law's holiday party.  Yes, that's a lot of pretzels.  

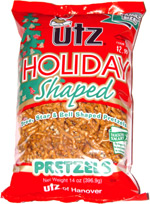
Last night, I went to the local grocery store and spent a while in the snack aisle looking for the right pretzels.

And you cannot imagine my delight when I saw this!

I was so excited, I let out an audible squeal and got some strange looks (always a fun experience at the grocery store).  :)  I ended up buying two bags and hand-dipping each and every tree, bell, and star.  Though this is the simplest thing to make, hand-dipping pretzels is a tedious task.  So be forewarned that if you want to make a huge batch, set aside a couple hours or enlist the help of a few friends and have a pretzel-making party. 

The incentive:  you get to eat all the broken pieces!  Yum!


Chocolate-Covered Peppermint Pretzels
{ Makes about 50 pretzels }

Ingredients
  • 1 package (12 oz) semi-sweet chocolate chips or white chocolate chips
  • 1 tbsp shortening (this helps temper the chocolate for dipping)
  • Large bag of pretzel twists
  • Peppermint candy canes 

Directions
  1. Place unwrapped candy canes in a ziploc bag and crush into small pieces with a hammer.
  2. Prepare a baking sheet by lining it with parchment paper.
  3. Combine the chocolate chips and the shortening in a small pot and stir over low heat.  Once the chocolate is smooth and melted, remove from heat.
  4. Using tongs, fork, or chopsticks, dip the pretzel in the chocolate.  Tap the chocolate-dipped pretzel several times to remove excess chocolate, and place it on the prepared baking sheet.  The chocolate dries quickly, so you'll want to sprinkle the peppermint while it's still wet.  Dip, place, and sprinkle every 5 pretzels or so.
  5. Place the pretzels in the refrigerator for about 30 minutes to set the chocolate.

I have about 200 pretzels sitting in my kitchen and tempting me at every turn.  These are lethal.

Spicy Korean Tofu Soup (Soondobu Jigae)

{ apologies for making your mouth water }
It's cold and wet outside.

Perfect excuse for spicy tofu soup!  Not that I need an excuse.  This is my favorite dish.  It's called soondobu jigae in Korean.  I could eat this all year round and have been known to (even on sweltering hot summer days).  But this soup is particularly good when it's cold out - it hits the spot and immediately warms you up!  And my personal motto when it comes to tofu soup is "the redder, the better."  I love it extra, extra spicy! 

There is a Korean restaurant by the name of So Gong Dong in northern New Jersey infamously known for their tofu soup.  And for good reason.  It's amazing!  James and I have tried others, and they just don't compare.  There's something about the tofu itself, but we're certain they add some top-secret, special ingredient to its broth.

I was determined to find out what.

So I began my quest by researching recipes online in an attempt to replicate the flavor of So Gong Dong's soup, and nothing came close.  I could never get it right.  I had nearly given up on the idea of ever making homemade tofu soup again.

Until one day at the Korean market, I laid eyes on this:

The tofu broth seasoning.

{ the secret ingredient? }
It certainly couldn't hurt to try.  The package includes 3 packets of seasoning powder and seasoning oil and for only $3.49.  I will preface by saying that I tried following the instructions on the package but found the flavoring pretty weak.  So I had to improvise and try out a few different variations.  And I think I finally found one I like (recipe below).

I'm certain this seasoning mix is not So Gong's Dong top-secret ingredient, but if prepared properly, it's great arsenal for making a pretty decent homemade version.  I always keep some in my pantry for days like this.

There are many variations you can make to this recipe.  I love the seafood tofu soup at So Gong Dong, so in the past, I've added uncooked shrimp and clams (make sure to add these once the soup is boiling and cook until clams open and shrimp turns pink).   Or you can add any of these ingredients:  sliced pork, beef, kimchi, or enoki mushrooms. 
Spicy Korean Tofu Soup (Soondobu Jigae)

Ingredients
  • 1 package of 1lb soft tofu (NOT silken - it gets too mushy)
  • 1 package Pulmone Tofu Broth Seasoning
  • 3 cups water
  • 1/2 tablespoon sesame oil
  • 1 scallion, sliced in small pieces
  • 1 teaspoon garlic, finely chopped
  • 1 egg, uncooked
  • 1/2 tablespoon of beef or fish flavor soup stock ("dashida") - add more to taste*
  • 1/2 tablespoon Korean hot bean paste ("gochujang") - add more to taste*
  • 1/2 tablespoon crushed red hot pepper ("gochukaru") - add more to taste*
[*When I first started making Korean food, I asked my mother for measurements in her recipes and she always told me there are no measurements.  You just taste it and add more or less and decide what tastes good.  Of course, this was not very helpful to me at the time, but she was right.  So these are just guidelines; I always end up adding a little more of each).

Directions:
  1. To prepare seasoning, mix 1 cup water, one package of Tofu Broth seasoning (powder and oil), and hot bean paste in a bowl.  Set aside.
  2. Cut up tofu into small cubes. 
  3. Place cubes in the seasoning mix and stir gently; be careful not to break up the tofu pieces (I find this step of soaking the tofu in the mix helps ensure the flavoring seeps in).  Set aside.
  4. In a pot, stir-fry the garlic and sesame oil over medium heat until lightly browned.
  5. Add the bowl of seasoned tofu to the pot, stir with the garlic, and cook over high heat for a few minutes; stir occasionally.   (This is another step I take to ensure better flavoring.  I find that if you add all the water right away, it loses some flavoring).
  6. Add 2 more cups of water and cook until boiling (if you prefer more soup, add more water).
  7. Add the beef or fish flavor soup stock and the crushed red hot pepper.  Add more of each to taste if necessary.
  8. Add uncooked egg to the soup and stir until cooked.
  9. Sprinkle with scallion and it's ready to serve. 
You can also make a non-spicy version of this soup, but really, what would be the fun in that?  :)

If you try this, I'd love to hear what you think and what modifications you would or did make.

Vanilla Cookie Sandwiches with Buttercream Frosting

{ cookie sandwiches with peppermint and toffee }
Although it's hard to find the time with two little ones, I love baking and trying new recipes when I can.  And I love baking even more when my son lends a hand!  Today CJ and I made these delights.  I got the recipe from Better Homes & Gardens Ultimate Cookie Book (one of my favorite cookie recipe books).

I love that the cookie itself is soft, chewy, and has just a hint of sweetness (which is perfect for the kids!).  When paired with the buttercream frosting, it gives it that perfect sweet guilty pleasure (perfect for the grown ups!).  The crushed candy adds a nice crunch.  I used peppermint candy canes and Heath toffee bars.


Vanilla Cookie Sandwiches with Buttercream Frosting
(from Better Homes and Gardens Ultimate Cookie Book)

FOR COOKIES
{ Prep time:  30 min  Chill:  2 hr  Bake:  6 min per batch
Makes:  about 30 sandwich cookies }

Ingredients
1/2 cup butter, softened
1 3-ounce package cream cheese, softened
1 cup sugar
1/2 teaspoon baking soda
1/4 teaspoon salt
2 eggs
1 1/2 teaspoons vanilla
2 3/4 cups all-purpose flour
Sugar (optional)
1 recipe Buttercream frosting (below)
Crushed candy of choice

Directions
1.  In a large mixing bowl beat butter and cream cheese with electric mixer on medium speed for 30 seconds.  Add the 1 cup sugar, the baking soda, and salt.  Beat until combined, scraping sides of bowl occasionally.  Beat in eggs and vanilla until combined.  Beat in as much of the flour as you can with the mixer.  Stir in any remaining flour.  Divide dough in half.  Cover and chill dough about 2 hours or until easy to handle.
2.  Preheat oven to 375 degrees.  On a lightly floured surface, roll half of the dough at a time until 1/8 inch thck.  Using a 1 1/2-inch round cookie cutter, cut out dough.  Place cutouts 1 inch apart on an ungreased cookie sheet.  If desired, sprinkle cutouts lightly with additional sugar.  Bake for 6 to 7 minutes or until bottoms are light brown.  Transfer to a wire rack; cool.
3.  Spread buttercream frosting onto the bottom halfs of the cooled cookies.  Top with the remaining cookies.  Roll edges in the crushed candy.


FOR BUTTERCREAM FROSTING
{ Start to finish: 10 min  Makes:  about 2 1/2 cups }

Ingredients
1 cup butter, softened
2 teaspoons vanilla
4 cups powdered sugar
2 to 4 tablespoons milk

Directions
In a bowl beat butter with an electric mixer on medium speed until fluffy.  Add vanilla.  Beat in half of the powdered sugar.  Beat in 2 tablespoons of the milk.  Beat in the remaining powdered sugar until smooth.  Beat in enough of the remaining milk to make a frosting of spreading consistency.

FOR THE CANDY COATING
Crush candy of choice (candy canes, peppermint candies, Heath toffee bars).  Easiest way to do this is to put the candy in a ziploc bag and crush with hammer.  Once the cookie is assembled, roll the edges in the crushed candy.

The end result?

An enthusiastic thumbs up from my taste testers!

Related Posts Plugin for WordPress, Blogger...